
Bathroom services · Manchester
Wet Room Installation
Manchester
A wet room replaces a raised shower tray with a fully waterproofed, level floor that drains away. Done correctly it is durable, accessible and practical. Done poorly it leaks into the structure below.
We survey every wet room project before quoting. A proper survey confirms whether your floor construction is suitable, where the drain can go, and what the ventilation requirement is — all of which affect the cost and the local approach.
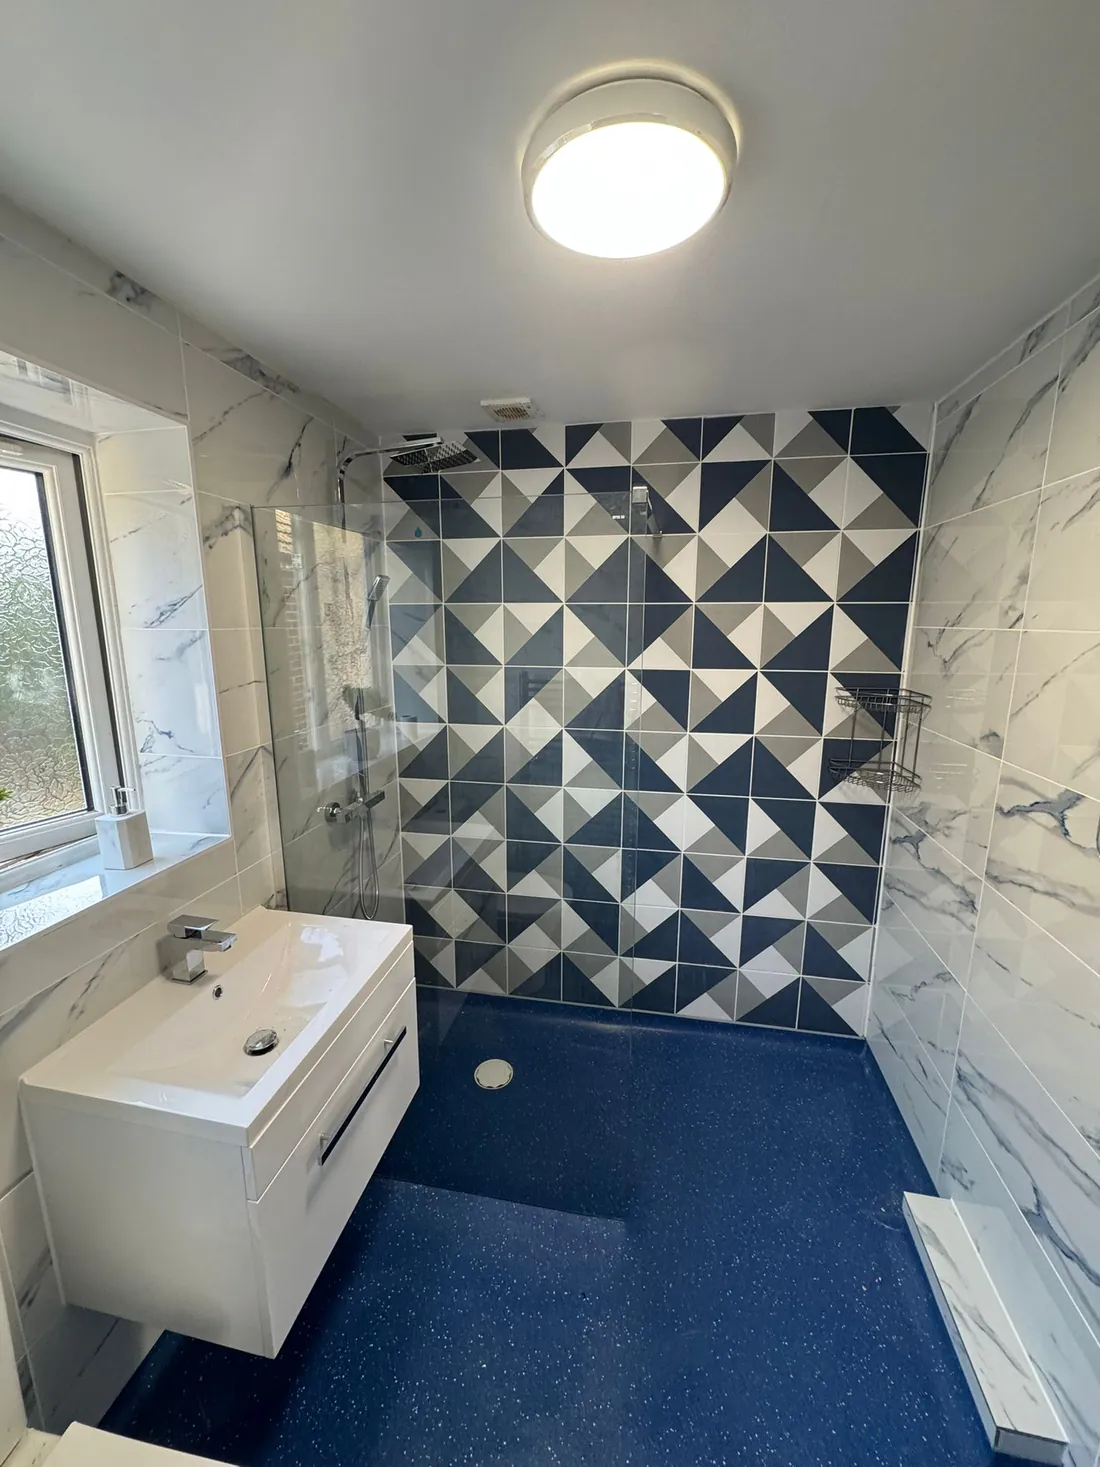
Level-access wet room — non-slip floor tiles
What it actually is
What is a wet room?
A wet room is a shower room where the shower area is at floor level — there is no raised tray. The entire floor surface is waterproofed (tanked) and graded to fall toward a drain set into the floor. Water drains away through the floor rather than into a tray waste.
A glass screen or panel is usually fitted to contain the main spray and keep the rest of the room drier, but the floor itself is the waterproof surface. This is different from a standard shower enclosure, where the tray provides the waterproofing and the walls above it simply need to repel splashes.
Because the floor is the waterproofing layer, the preparation work matters enormously. The floor must be rigid (no flex), correctly levelled to achieve the right fall to the drain, and the tanking system must be applied properly — particularly at corners, pipe penetrations and the floor-to-wall junction. These are the areas where poorly installed wet rooms fail.
Why people choose a wet room
Accessibility
No step over a bath or tray edge — important for older users, anyone with mobility limitations, or simply for ease of use. The level floor also makes wheelchair and shower chair use possible.
Space
Removing a raised tray can make a small bathroom feel more open. The absence of a bulky enclosure frame makes the room easier to clean and visually less cluttered.
Durability
A properly tanked wet room floor is very durable. There is no tray to crack or fail, no enclosure tracks to collect grime, and the tiled or coated surface is robust.
Bath conversion
One of the most common uses — removing an unused bath and installing a practical shower area in the same footprint, often making the room considerably more usable.
Before the survey
Is a wet room suitable for your property?
A wet room is not suitable for every bathroom without some preparation or adjustment. These are the main factors we assess during the survey. You do not need to know the answers before contacting us — but understanding them helps explain why the survey is necessary before any reliable quotation can be given.
Floor construction
A concrete ground floor is usually the most straightforward. You can cut into it to position the drain and achieve the right falls. A timber suspended floor is workable but requires more preparation: the joists may need reinforcing, the boards are replaced with a cement substrate board, and the whole assembly needs to be rigid enough to prevent flex, which can crack tiles or compromise the waterproofing over time.
Drainage routes
The drain in a wet room needs to connect to your existing soil and waste system. We need to establish where your current bathroom waste exits the building, how deep it runs, and whether the new drain position can connect to it with adequate fall. In some layouts the drain can go where you want it; in others it is constrained by the existing pipework.
Room size
A wet room works local when there is enough floor area to keep a usable dry zone: somewhere to stand and dry yourself without soaking the rest of the room. Very small bathrooms can be converted but the layout and screen arrangement need careful thought. The survey will confirm what is practical for your space.
Upper floor properties
A wet room on an upper floor is achievable but requires closer attention to the floor build-up, the waterproofing system and the integrity of the ceiling below. Any existing damp or water damage to the subfloor should be addressed before the new installation goes in.
Ventilation
Building Regulations Part F requires mechanical extract ventilation in a wet room: a fan that runs continuously at a low background rate and boosts when the room is in use. If the bathroom does not already have adequate mechanical ventilation, this will need to be added as part of the project.
Existing condition
If there is known damp, mould, a previously leaking shower or any soft spots in the floor, these should be investigated and resolved before waterproofing. Installing a wet room over a compromised substrate is likely to cause problems later.
What we need from you
Decisions that affect the quote
The more clearly you can describe what you want before the survey, the more useful our initial response will be. You don't need to have made every decision — but having a view on the following will help us understand the scope and give you a more accurate picture of cost early on.
Wall finish — tiles or wall panels
Tiles are the traditional choice for wet rooms: durable, water-resistant and available in a huge range of finishes. They require grouting and the grout lines need occasional maintenance, but a well-tiled wet room lasts decades. Porcelain is the most hardwearing option; natural stone looks excellent but needs periodic sealing.
Wall panels (sometimes called cladding or wet wall panels) are large acrylic or PVC composite sheets that click or bond into place with no grout lines. They are quicker to install, easier to clean day-to-day, and can look very clean and contemporary. Quality varies. At the lower end they can flex slightly, and the joins need careful sealing. Mid-to-higher-grade panels look good and perform well.
Telling us which direction you are leaning before the survey helps us give you a more accurate initial indication of cost and time.
Floor finish — tiles or vinyl / LVT
In most wet rooms the floor is tiled, typically with a small-format porcelain or slip-rated ceramic, because tiles can be cut and laid to achieve the required drainage fall while still looking clean and consistent. The slip rating of the tile matters: a floor tile for a wet room should have a suitable wet slip resistance rating (R10 or higher, or a pendulum test result above 36).
Luxury vinyl tile (LVT) is an option in some conversions, particularly where a timber floor is being retained. A good-quality waterproof LVT with heat-welded seams can perform well in a wet room environment, and it is warmer underfoot and easier to stand on barefoot than porcelain. However, not all LVT products are suitable. The threshold detail, drain surround and any seams need to be treated carefully. We will advise on whether LVT is appropriate for your specific floor setup during the survey.
Drain type — point drain or linear channel
A point drain sits in one position (typically in the centre of the shower area or near a corner) and the floor tiles fall toward it from all directions. It is the most straightforward type to install in most situations.
A linear channel drain runs along one wall or across the floor in a single line, with the floor sloping in one direction only. It looks very clean and modern, and is often easier to maintain because the channel can be lifted out and cleaned. However, it requires the entire floor to drain toward a single linear edge, which involves more precise floor levelling and preparation. It also requires the drain channel to connect to the waste run, which in some layouts is more complex to achieve.
Both types work well. The choice depends partly on the room layout, partly on your drainage routes and partly on personal preference for how the finished floor will look.
Shower controls — manual thermostatic or digital
A manual thermostatic shower valve keeps the water at a set temperature even if someone runs a tap elsewhere in the house. It is reliable, straightforward and the most common choice for wet rooms. A separate stop valve on the outlet allows the showerhead to be switched on and off while the temperature stays constant.
Digital shower systems are controlled electronically. You can set the exact temperature from a remote pad, and some allow pre-programming via an app. They work well but require a compatible water pressure and flow rate, and some require an electric supply to the valve itself. We will confirm compatibility during the survey.
Screen — glass panel, frameless screen, framed, or open
Whether and how you contain the shower spray is one of the bigger aesthetic decisions in a wet room. Options include:
A fixed glass panel is a single sheet of toughened glass fixed to the wall, which deflects the main spray without fully enclosing the shower. Looks very clean. Works well in larger rooms where the toilet and basin are far enough away to stay dry.
A frameless hinged or sliding glass screen provides better containment while keeping an open feel. The floor seal along the bottom must be maintained to prevent water bypassing it.
A framed screen is a traditional aluminium-framed enclosure. More affordable, robust and easier to re-seal if needed.
A fully open wet room has no screen at all. Works local in rooms where the shower area is clearly separated from the rest of the room, and where the floor and drain arrangement reliably contains the water to the shower zone.
We will talk through what makes sense for your room layout during the survey.
Toilet, basin and storage — retain or replace
If the existing toilet and basin are in good condition and the positions work with the new layout, they can usually be retained. If the layout is changing significantly — for example if the shower is moving to where the toilet currently sits — the soil connections will need to be rerouted.
Replacing the suite at the same time as the wet room is often cost-effective because the room is already being stripped and replumbed. Back-to-wall toilets and wall-hung basins free up floor space and make the room easier to clean around. Let us know at the survey stage whether you want to keep the existing suite or replace it.
Not sure yet? That's fine.
You do not need to have made any of these decisions before the survey. Bring your questions and we will go through the options with you on the day. Submitting photos and rough dimensions before the survey visit helps us prepare more useful information in advance.
Open CHP Hub — submit photos & request a surveyCommon project types
Types of wet room project we carry out
Bath-to-wet-room conversion
The most common project — removing an existing bath and installing a level-access shower area in the same space. Works well when the bath is rarely used and the space would be more practical as a shower room. The key question is whether the existing waste position suits the new drain location.
Accessible wet room installation
A wet room designed specifically for accessibility — level-access shower area, fold-down shower seat, grab rails positioned to the user's needs, non-slip floor tiles with an appropriate slip rating, and a close-coupled or wall-hung toilet at the right height. The survey will confirm all positioning based on the user's requirements.
Like-for-like wet room renewal
An existing wet room where the waterproofing or drainage has failed, the tiles are loose, or the finish has deteriorated. The extent of the remedial work depends on the condition of the substrate. If the tanking is intact and the substrate is sound, the tiles can often be re-laid. If the tanking is compromised, the floor needs to be taken back and re-tanked.
Full bathroom-to-wet-room refurbishment
A complete bathroom refurbishment where the wet room replaces the entire existing bathroom layout — new soil connections, new suite positions, re-tiled or re-panelled walls, new flooring and ventilation. The scope and programme for this type of project are confirmed at the survey stage.
Walk-in shower with wet room principles
For rooms where a raised tray enclosure is not wanted but a fully level floor is not necessary, a very low-profile tray (typically 25–40mm) set into the floor can give a similar appearance with slightly less floor preparation required.
Small bathroom wet room
A small bathroom can often be converted to a wet room to make the space feel larger and more open. The layout requires careful thought to ensure the shower spray does not soak the toilet and basin, and a suitable screen arrangement is usually needed.
From enquiry to completion
How the job works
A wet room project has more stages than a straightforward bathroom refit because the waterproofing preparation is critical and cannot be rushed. Here is what the process looks like from start to finish.
Submit your request
Open CHP Hub, create an account or log in, and choose a bathroom or wet room request. Add photos of the existing room, approximate dimensions, what you want to change and any accessibility requirements. The more detail you include, the more useful the initial response will be.
Initial review
We review your photos and description and come back with an initial indication: whether a site survey is needed before any pricing can be offered, and any early observations about layout or feasibility. For some straightforward conversions an outline figure can be suggested before the survey; for more complex work or older properties a survey is always required first.
Site survey
A survey visit typically takes between one and two hours. We measure the room, check the existing floor construction, assess the drainage routes and falls available, inspect the soil and waste connections, check the water supply and pressure, look at the ventilation provision and discuss the layout you want. We also check for any existing damp, water damage or structural concerns that would need addressing before the wet room goes in.
Layout and scope confirmation
Following the survey we agree the layout: drain position, shower area, screen arrangement, toilet and basin positions, lighting and ventilation. We confirm which materials you have chosen (wall tiles or panels, floor tiles or LVT, drain type, screen type) and identify anything that needs a decision before work can begin. If changes are needed from your initial idea based on what the survey found, we will explain why clearly.
Written quotation
You receive a written quotation itemising the scope of work: strip-out and disposal, drainage work, plumbing alterations, floor preparation, waterproofing, wall and floor finishes, fittings, ventilation and any additional works required. The quotation makes clear what is included and what is not. No work starts until the quotation is agreed in writing.
Strip-out and preparation
The existing bathroom is cleared: bath or shower, toilet, basin, tiles and floor covering removed as agreed. Access routes are protected with dust sheets and floor coverings. Any discovered issues with the subfloor or hidden plumbing that were not visible before strip-out are assessed and discussed with you before the work proceeds.
First-fix plumbing and drainage
The new drain is positioned and connected to the waste run. Shower supply pipework is roughed in: hot and cold feeds to the shower valve position, and any re-routing of the toilet soil connection or basin waste if the layout has changed. All pipework is pressure-tested before it is covered.
Floor preparation and levelling
The floor is prepared to receive the waterproofing system. On a concrete floor this typically involves grinding or levelling to establish the correct falls toward the drain. On a timber floor the boards are replaced with a rigid cement substrate board fixed to prevent any deflection. A floor levelling compound may be used to achieve the precise gradient required.
Waterproofing (tanking)
The waterproofing system is applied to the floor and the lower section of the walls, using a liquid-applied membrane worked into all corners, around the drain and over all pipe penetrations. Wall-to-floor junctions are treated with reinforcing tape embedded in the membrane. Curing time must be respected before tiling begins. Attempting to tile over a wet or under-cured tanking system is a common cause of wet room failures.
Wall and floor finishes
Tiling begins with the floor, working from the drain outward to maintain the falls and ensure consistent joint widths. Wall tiles or panels are then fixed. On tiled walls, grout choice (colour, epoxy vs standard) is confirmed at this stage. On panel walls, all joints and the floor-to-panel interface are sealed with appropriate silicone.
Second-fix fittings
The shower valve, showerhead and rail (or fixed head), glass screen or panel, basin, toilet, towel rail and any accessories are fitted and connected. Silicone sealant is applied to all wet joints — between the screen and wall, the screen and floor, basin and wall, and anywhere else that requires a waterproof seal. Ventilation is connected and tested.
Testing and handover
The shower is run to confirm drainage is working correctly and there is no water reaching areas it should not. The screen seal and all silicone joints are inspected. The waste runs are checked throughout. We explain how the shower controls work, how to maintain the grout and silicone over time, and what to do if you notice any problems. The space is cleaned before we leave.
Two Ways to Work With Us
Choose the service model that fits your needs - whether you're planning ahead or need urgent assistance
Fixed Price
Scheduled Non-Emergency
Price confirmed before work
Book times that suit you
Parts & labour included
On all boiler installs
Hourly Rates
Emergency Same/by arrangement
Engineer dispatched fast
Nights, weekends, holidays
Callout + hourly breakdown
Pay only for time on site
What affects the price
What affects the quotation
Wet room costs vary considerably depending on these factors. Understanding them helps explain why a reliable price cannot usually be given without a survey.
Floor type
A concrete floor is typically less work to prepare than a timber suspended floor, which requires substrate board, possible joist reinforcement and more careful preparation to prevent future movement.
Drainage relocation
If the drain can go where the existing bath or shower waste ran, the pipework work is straightforward. If the drain needs to go in a new position — particularly on a ground floor where the waste run below is fixed — there is more work involved.
Wall finish choice
Tiles typically take longer to fix than wall panels, particularly on walls that are not perfectly flat. The cost of the tiles themselves varies considerably depending on format and material.
Floor finish choice
Standard porcelain floor tiles are cost-effective. Large-format tiles or natural stone require more careful laying and wastage tends to be higher. LVT flooring in a wet room application requires specific products and careful detailing at the drain and threshold.
Toilet and basin
Retaining the existing suite and positions is generally less expensive than replacing it or moving the soil connection. Wall-hung or back-to-wall toilets require a concealed cistern frame which adds cost but frees up floor space.
Room condition
A room that strips out cleanly to sound walls and a solid floor is quicker to work in than one where damp damage, missing plaster, poor previous tiling or compromised structural elements need remedying first.
Screen type
A fixed glass panel is typically less expensive than a frameless hinged screen. Larger glass panels require thicker glass and more precise fixing.
Accessibility fittings
Grab rails, fold-down shower seats and other accessibility fixtures add to the material cost. Positioning them correctly relative to the user's needs and the structural walls requires care and sometimes specialist fixings.
Common questions